
Day 2: Setting Up WordPress Blog
July 13, 2008 by Antony
Welcome back to Day 2! Congrats on taking the first steps yesterday to becoming an internet entrepreneur! Now its time to create your blog and install some essential plug – ins that will help in your blogs S.E.O. as well as other convienant features.
Since you have signed up with Hostgator for hosting services I’m going to describe to you the process for getting your single click install for wordpress. Start by logging into your email, the one that you signed up with Hostgator under.
Under the email look for the following:
“Until your DNS has changed over to our nameservers, you can access your cPanel at:”
Under that you will have an IP address with the ending having /Cpanel. Go ahead and click on that now and login using the login that you created, if you forgot it is also in this email. Once logged in you will be presented with a screen that looks like this.
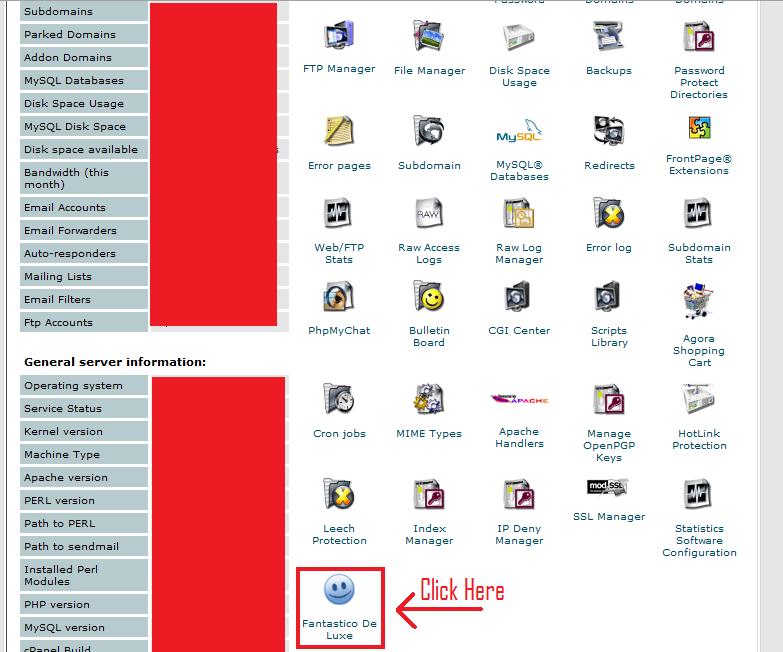
Great, now as in the picture click on the Fantastico De Luxe. This is where you can do single click installs on hundreds of different web based softwares. It’s a great utility and thats one reason why Hostgator sets themselves apart from the rest!
After you have clicked on that you will now be presented with this screen
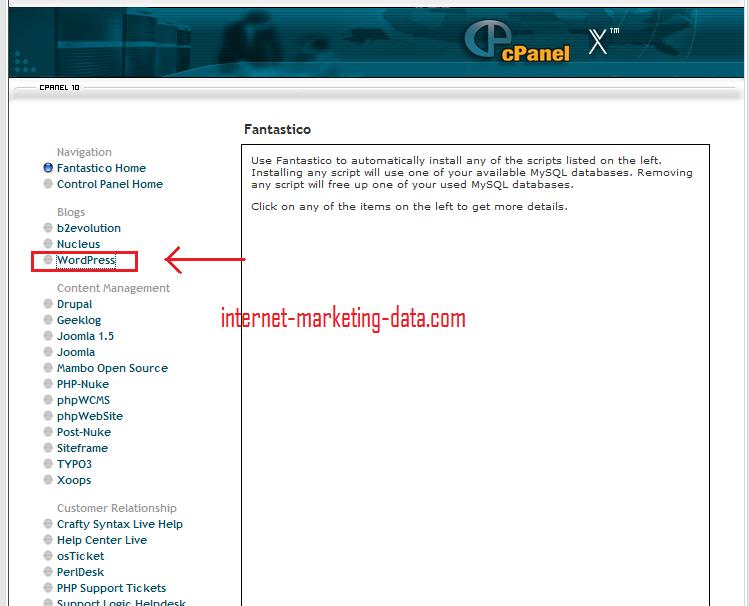
Click on the WordPress login and just follow the instructions, this will now install WordPress on your Domain and you will be ready to plug away in less than 30 seconds. Now you have your first WordPress blog installed on your own domain!
After everything is installed you will want to visit the following URL. Point your browser to http://YOURDOMAIN.com/wp-admin. This will allow you to login to your new blog with the password and login you created in the Cpanel single click install. This allows you to have access to everything that WordPress has to offer.
Now it’s time to install some necessary WordPress plugins and themes if you choose to change the theme of the blog. Again it is up to you if you want to change the theme, but I highly suggest installing the following plug-ins for your WordPress blog. These will help you in the process of gaining high organic search results and having the necessary tools to be an internet entrepreneur.
Here are the plug-ins that you will want to download. Please RIGHT CLICK and go to Save As!
Now you have the necessary tools to have your WordPress optimized for Google’s search engines and other major search engines as well as having a Google sitemap! You will now need to install these plug-ins into your WordPress. This may seem complicated or technical but it really isn’t! As long as you follow exactly what I say you will be perfectly fine.
Head over to the SmartFTP website and choose your Operating System for the install. Smart FTP Website. After installing the Smart FTP program you will want to go to the main screen. Under the main screen you will see the following fields.
![]()
Enter your domain in the YOUR-DOMAIN.COM field, with your username and password to the right of that. Go ahead and click the green arrow once those fields are filled in. The program will login to your website and you now have access to all you folders on your website. DO NOT PLAY AROUND, this is your whole web-site and you don’t want to go and click around if you aren’t familiar with everything. You can ruin your website and everything you have done up until this point.
From here you are going to to want to click on Public_HTML folder that is displayed on the left side screen. Then click on YOUR DOMAIN folder that is listed underneath the Public_HTML folder. Great, you are almost finished. Now click on the WP-CONTENT folder. This will open the WP-Content folder and you will have access to the plugins folder. This is displayed directly under the WP-CONTENT folder that you just clicked on. Go ahead and click on the plugins folder. This is where you are going to copy those 2 files I told you to download above. Go ahead and open the folder that you saved those to and drag and drop them in the PLUGINS folder. Make sure that you have the plugins folder highlighted when you drag and drop them into this folder!
Now you are almost finished, just go ahead and close out of the Smart FTP program once you see that the files have transferred and the Smart FTP program has completed its tasks. It shouldn’t take very long to upload those files, maybe 2-3 minutes at most.
Head back into either Internet Explorer or Firefox, or whatever you use and go to you YOURDOMAIN.COM/wp-admin and login to your WordPress blog.
From here you will want to click on the Plug-Ins tab on the far right of your WordPress admin screen. Now you will see the two plug-ins that you just uploaded to your WordPress blog. Go ahead and find them listed below and click the ‘Activate’ button to the right of them. This will now activate and install those plug-ins!
Now comes the part where you actually have to think a little bit. Once you have activated both of those plug-ins head over to the ‘Settings’ tab which is right next to the Plug-ins one that you just selected.
Now look for the All-In-One SEO and the XML Sitemaps buttons that were just added to your blog. Let’s start with the All-In-One SEO. Select that option now.
From here you will need to enter the following fields to make sure that your blog is optimized correctly for the keywords that you are trying to target.
If you are little lost on which keywords you are trying to target let’s go back to the bass fishing theme that we used in yesterday’s guide. Open up the Wordtracker Free Keyword Tool this will bring us back to the tool that we can get some ideas for keywords to use for our title and our description and keywords.
So by typing in Bass Fishing into the keyword tool we are presented with keywords that are similar to the bass fishing theme and that are searched frequently. You want keywords that are actually searched, you aren’t looking for keywords that are never searched because its most likely you won’t get much traffic from them.
For the bass fishing theme we will try and target the following keywords; bass fishing techniques, bass fishing homepage, bass fishing reports, bass fishing tips.
In your title under the All in One SEO plugin, choose a title that is your MAIN keyword. In this case let’s use the title Bass Fishing Techniques – The Complete Bass Fishing Homepage.
This will really help for the keywords Bass Fishing Techniques and Bass Fishing Homepage. Now use the Wordtracker tool to find keywords for your description and the ‘home keywords’ fields. Your description shouldn’t be ONLY keywords and should sound like a human can read/wrote it. So try and create a captivating message to have people click on your homepage from Google and that has a few keywords in it.
The ‘Home Keywords’ that you use will be found from the Wordtracker tool. Just fill them in with a comma between each keyword!
Ok! Almost done, leave all the other fields alone unless you know what you are doing. Scroll down to the bottom and select the Update Options button. Don’t do the ONE CLICK upgrade button at the top of the screen, that only updates the plug-in with the latest version. It doesn’t update your S.E.O.
Almost done, I know it has been a long day but you are almost finished. We just need to create the Google Sitemap and you are finished with Day 2!!!! Great job today by the way, I’m very proud of you.
Go back over to the Settings button on the right side of your WordPress admin login. Select the XML-Sitemap button. This is the easiest plug-in to configure. Just click the ‘BUILD sitemap button’ or whatever the variation is. That’s it! Once it tells you that the sitemap was updated you are finished! You have built the sitemap for Google and notified Google that you are human and exist.
Tomorrow will be another HUGE day, I’ll discuss some very crucial techniques to begin bringing in the money and traffic. For now go ahead and relax, you had a busy day.
Comments
Feel free to leave a comment...
and oh, if you want a pic to show with your comment, go get a gravatar!